
Nexus Gateway
The Site24x7 Nexus Gateway is a lightweight, secure software component that acts as an intermediary between the Site24x7 agents operating within your intranet and the Site24x7 monitoring platform. It supports high availability and enables multiple Nexus Gateways to work together as a Nexus Gateway Group, ensuring that monitoring continues seamlessly even if one server becomes unavailable.
All Site24x7 agent requests are routed through the Nexus Gateway, which securely forwards them to Site24x7 over the internet. This approach ensures that the agents themselves never require direct internet exposure, thereby reducing security risks.
How it works
-
The Nexus Gateway receives data and communication requests from Site24x7 agents within your internal network.
-
It securely transmits this information to Site24x7's cloud servers via outbound HTTPS communication channels.
-
The Nexus Gateway is registered to a specific Nexus Gateway Group using the Nexus Gateway Group key provided during installation.
-
Once the installation is complete, it automatically appears under the corresponding Nexus Gateway Group in the web client.
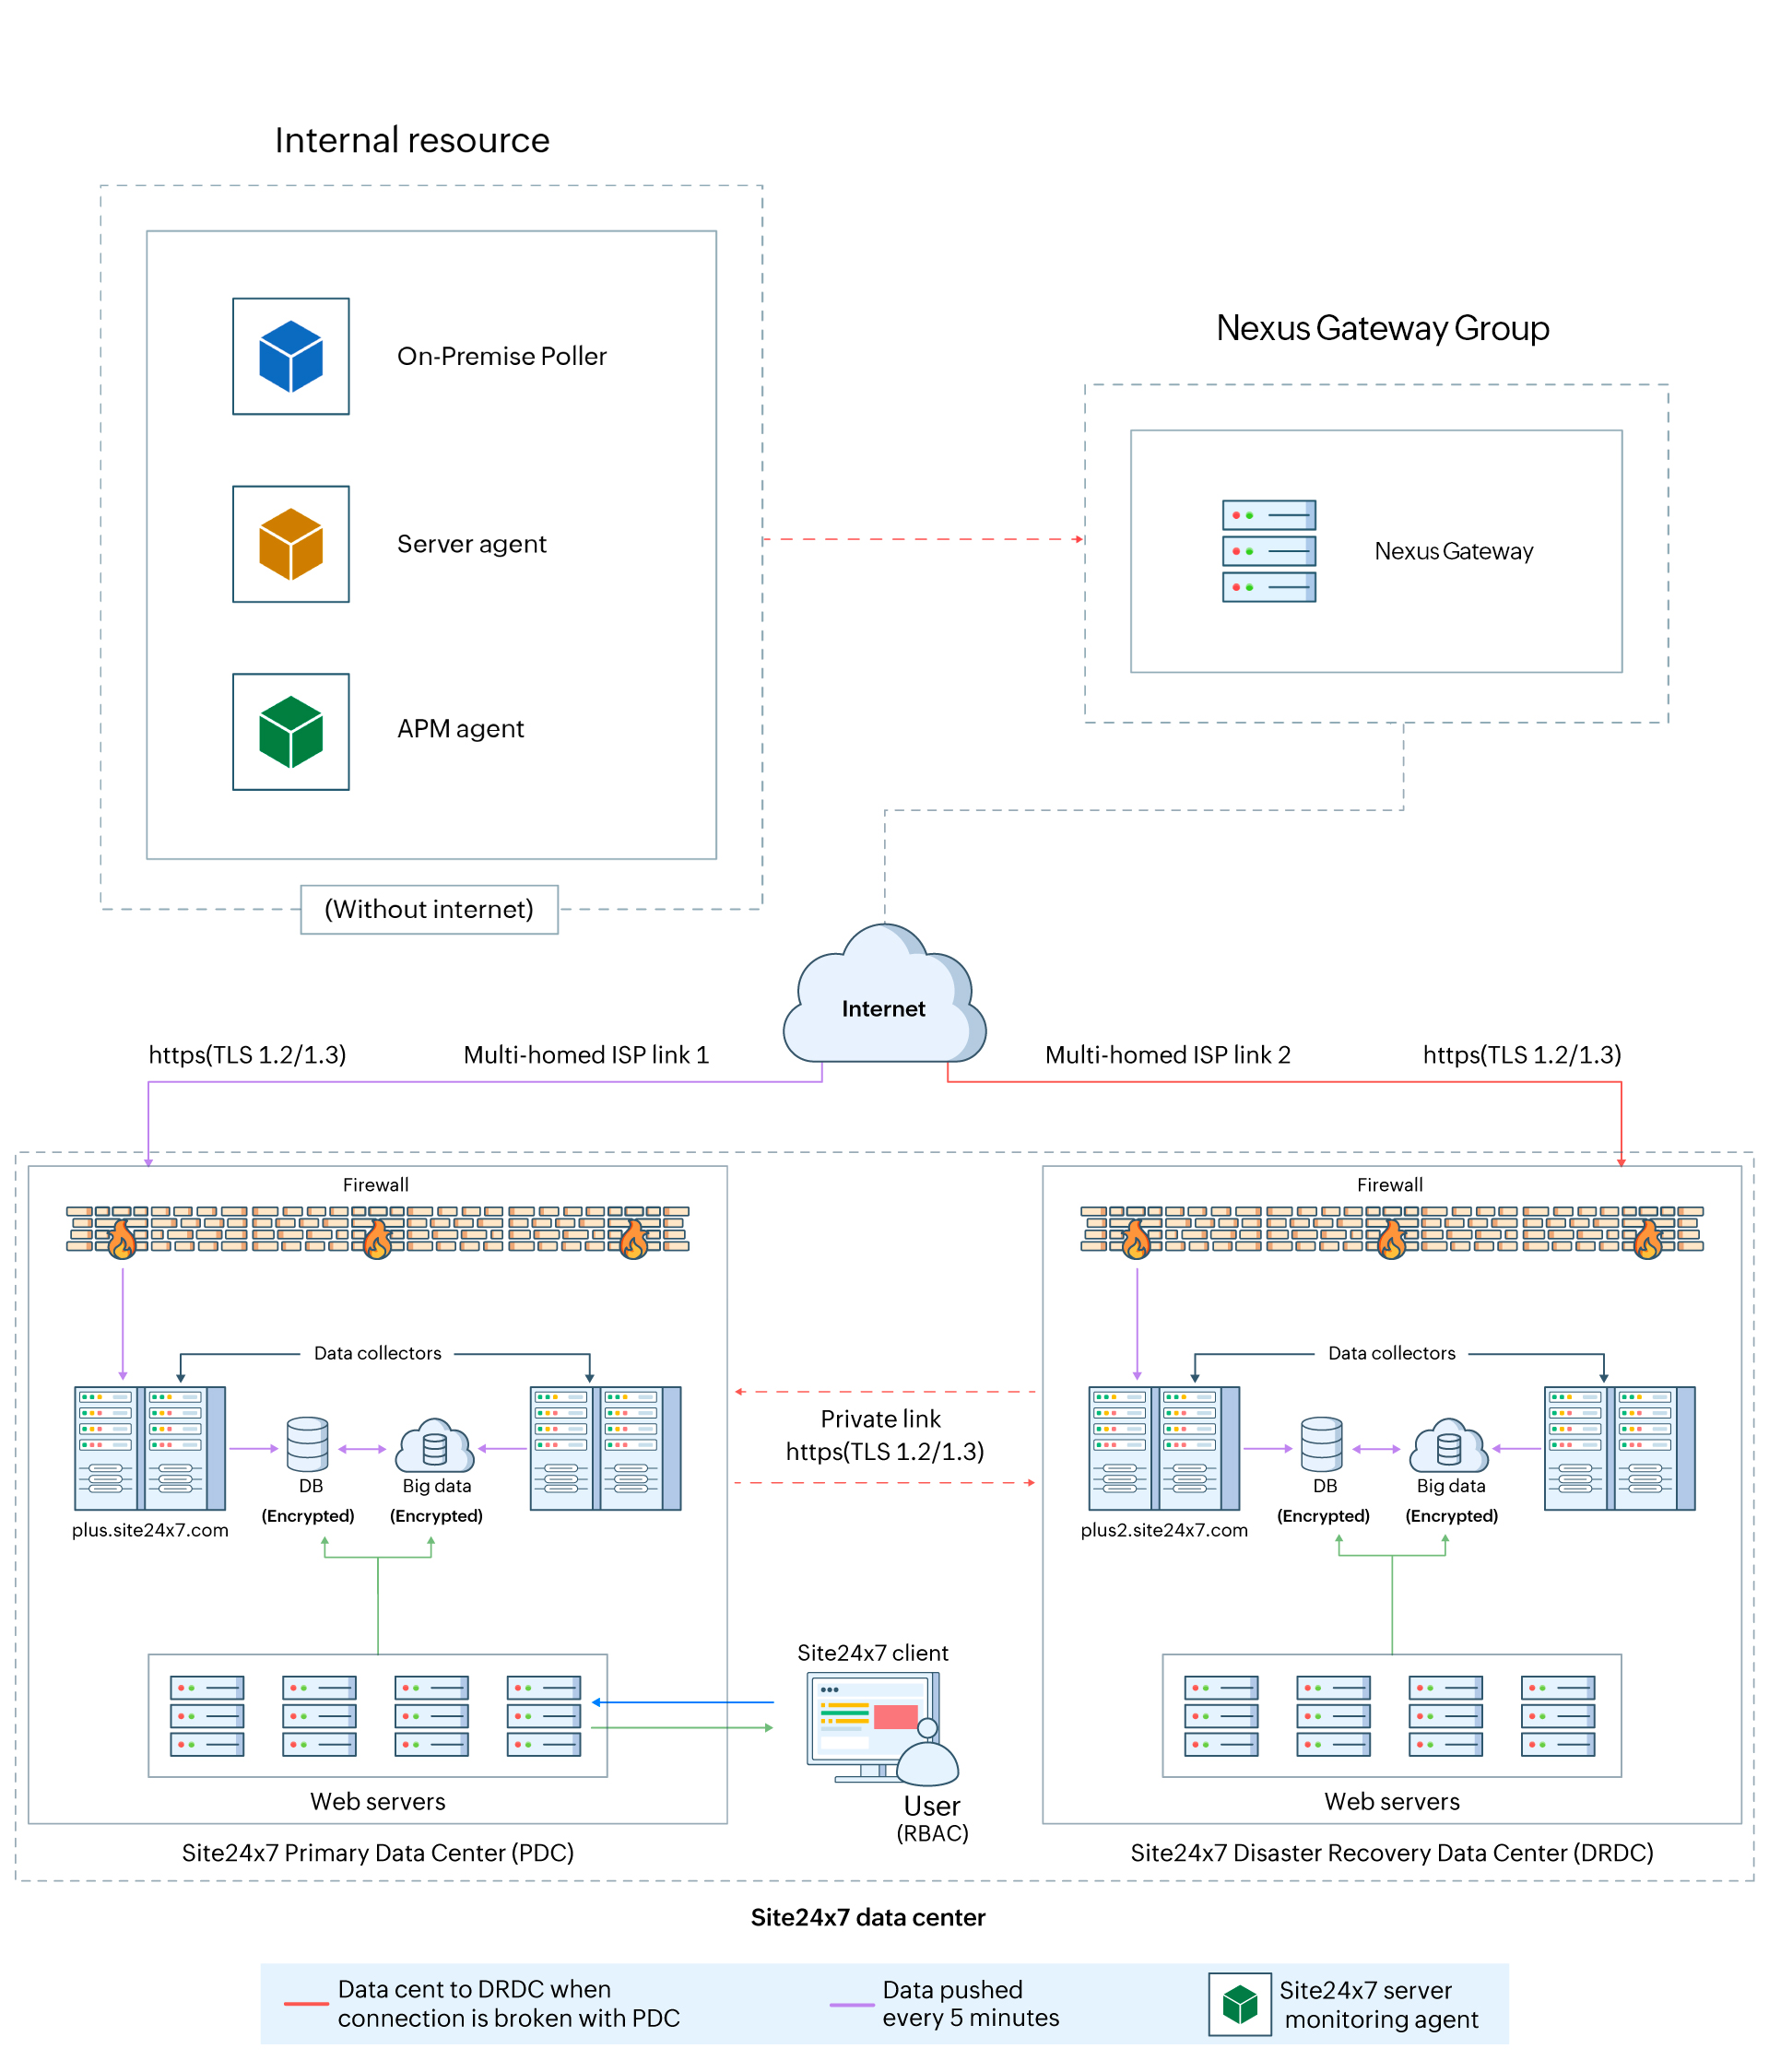
The Nexus Gateway functions as an HTTP proxy, securely routing all agent traffic to Site24x7 without requiring direct internet access for the agents.
System requirements
The machine on which the Nexus Gateway will be installed should meet the following requirements:
| RAM | 8GB of physical memory (A minimum of 4GB of memory is required apart from the memory consumed by the OS and other processes) |
| Processor/Virtual processor | 4 processors/8 virtual processors |
| Processor speed | 2GHz or above |
| Disk space | 20GB or higher |
| OS | Windows or Linux |
| OS type | 64-bit |
-
The default port 3128 is opened automatically on the machine during installation. You can modify this port in the Nexus Gateway configuration to use a custom port if required.
-
The Nexus Gateway needs to be started with root or administrator privileges after installation, depending on whether the machine's OS is Linux or Windows.
-
At least one Nexus Gateway should be associated with the Nexus Gateway Group to allow this Nexus Gateway feature work.
- While both Windows and Linux-based installations are supported, we recommend installing the Nexus Gateway on a Linux-based system. Windows-based installations are recommended only for smaller environments, typically supporting up to 100–150 agents.
Install a Nexus Gateway
- Log in to Site24x7.
- Navigate to Admin > Nexus Gateway Group.
Depending on the current state of the Nexus Gateway Group, you may encounter one of the following scenarios:
- Nexus Gateway Group with existing Nexus Gateways: The group already contains one or more Nexus Gateways. You can add a Nexus Gateway directly by clicking the existing Nexus Gateway Group. Then, navigate to the Nexus Gateway tab. Next, click the Add Nexus Gateway button on the top-right of the table and follow the subsequent installation steps from step 3.
- Nexus Gateway Group with no Nexus Gateways: The group is currently empty, indicating that no Nexus Gateways have been associated with it yet.
- Click the Nexus Gateway Group and follow the below guided steps to add a Nexus Gateway for Linux or Windows.
- Using the Nexus Gateway Group Key, you can associate each Nexus Gateway with a respective group during installation. You can also install a new Nexus Gateway and associate it with a group using the Nexus Gateway Group Key.
- Toggle between Windows and Linux in the Select Platform field to start the platform-based installation.
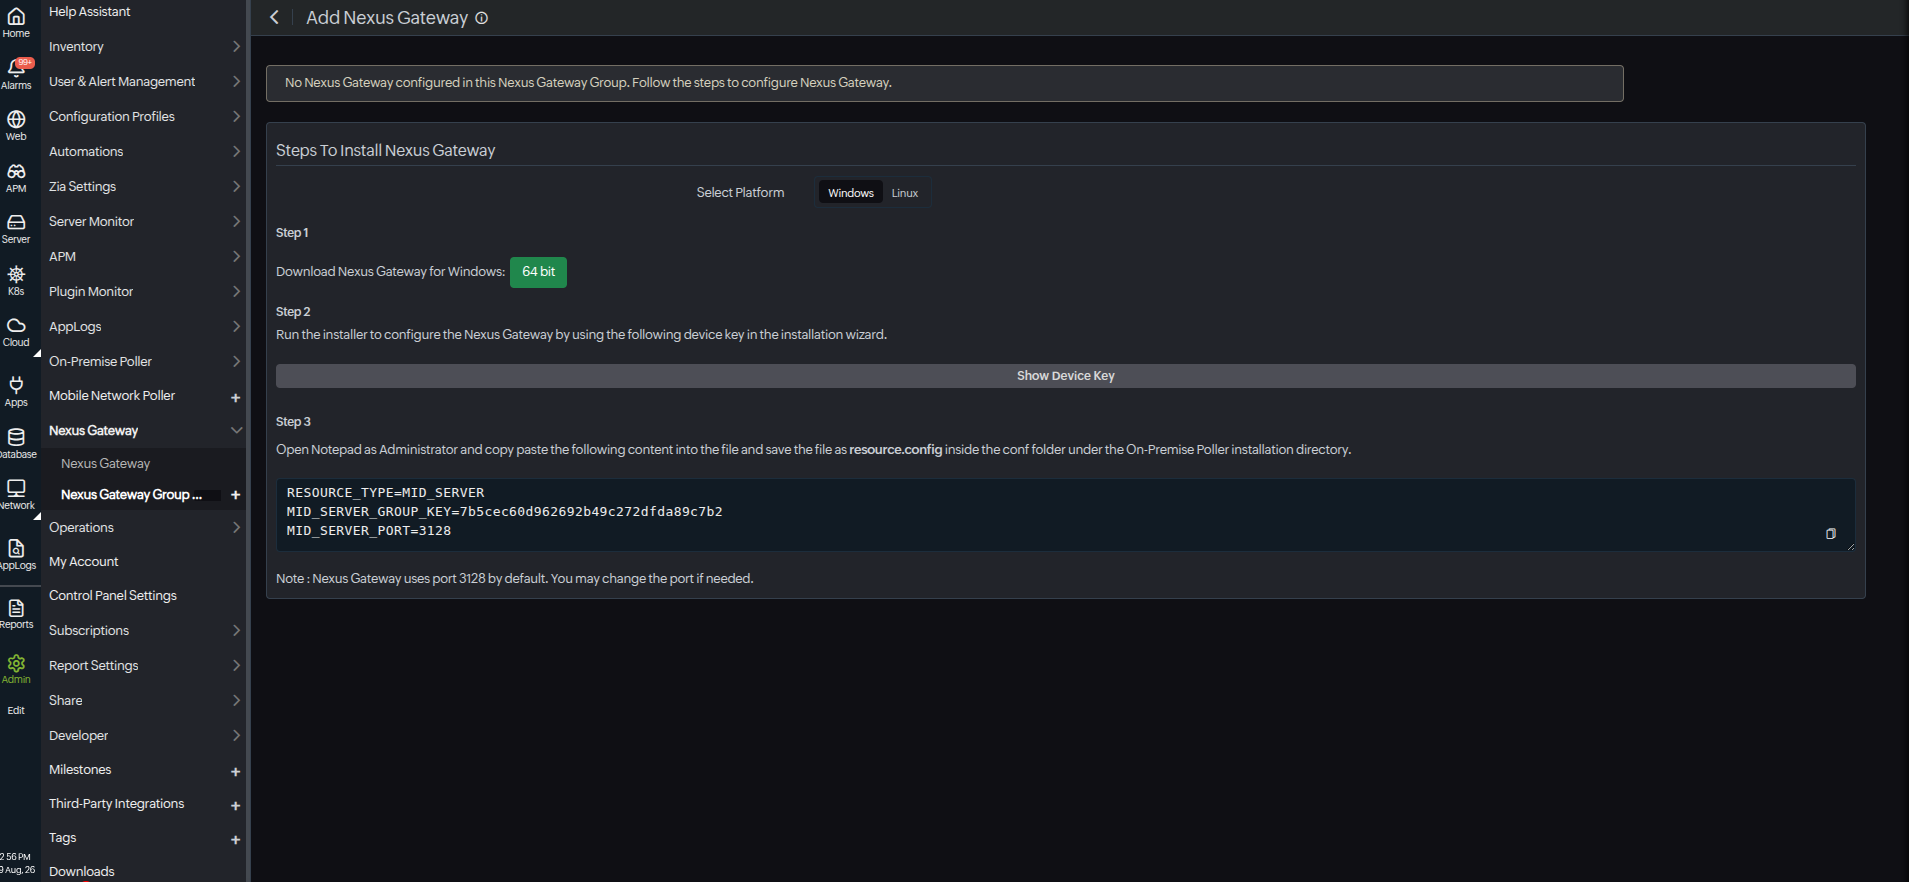
Installing a Nexus Gateway on a Windows machine
- Click the 64-bit to start downloading the Nexus Gateway installer.
- Run the installer and follow the on-screen instructions.
- When prompted, copy and paste the Device Key from the Add Nexus Gateway page (unique to your installation instance). You can view the device key by clicking Show Device Key.
- Choose Nexus Gateway as the resource type on the Site24x7 On-Premise Poller pop-up page.
- Next, open Notepad as an Administrator and paste the following content into the file. Then, save the file as resource.config inside the conf folder under the On-Premise Poller installation directory. When saving the resource.config file, change the file type to All Files instead of .txt.
RESOURCE_TYPE=MID_SERVER
MID_SERVER_GROUP_KEY=MID_SERVER_PORT=3128 NoteNexus Gateway uses port 3128 by default. You may change the port if needed.
Installing a Nexus Gateway on a Linux machine
- Run the following commands in your terminal:
sudo wget https://staticdownloads.site24x7.com/probe/Site24x7OnPremisePoller_64bit.bin
sudo chmod 755 Site24x7OnPremisePoller_64bit.bin
sudo ./Site24x7OnPremisePoller_64bit.bin - Run the installer and follow the on-screen instructions.
- When prompted, copy and paste the Device Key from the Add Nexus Gateway page (unique to your installation instance). You can view the device key by clicking Show Device Key.
- Create a file named resource.config inside the conf folder in the directory where the On-Premise Poller is installed. Paste the following code and save the file.
RESOURCE_TYPE=MID_SERVER
MID_SERVER_GROUP_KEY=MID_SERVER_PORT=3128 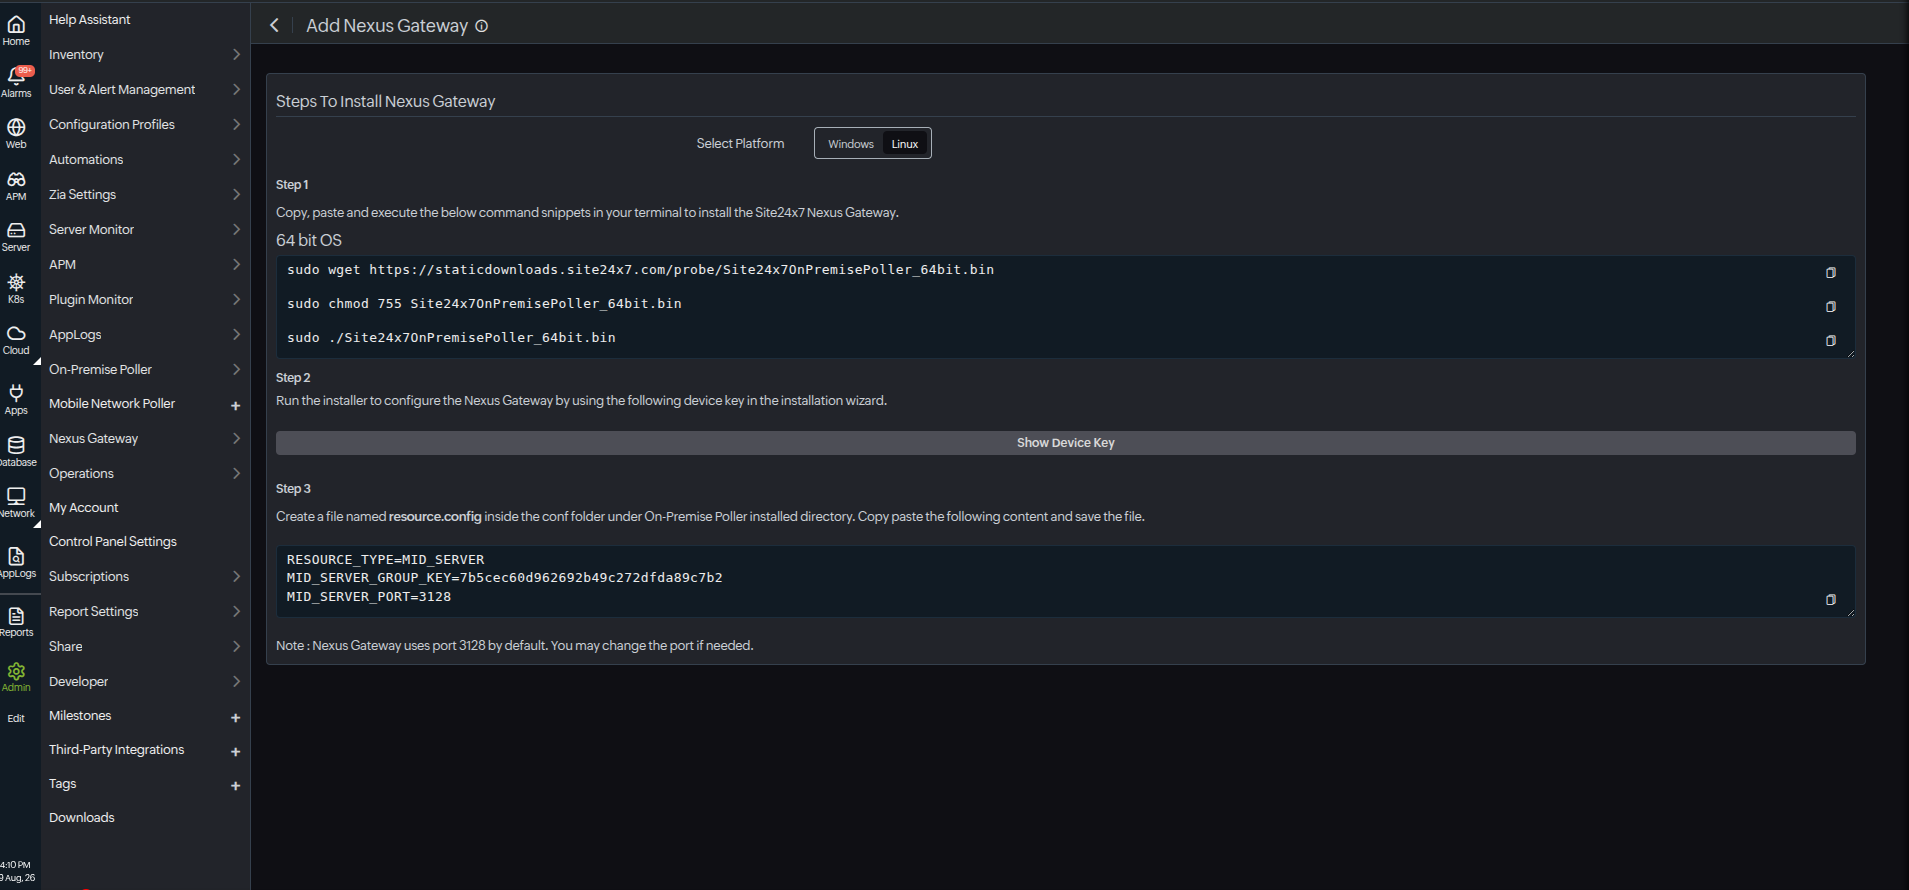
Verify the installed Nexus Gateway
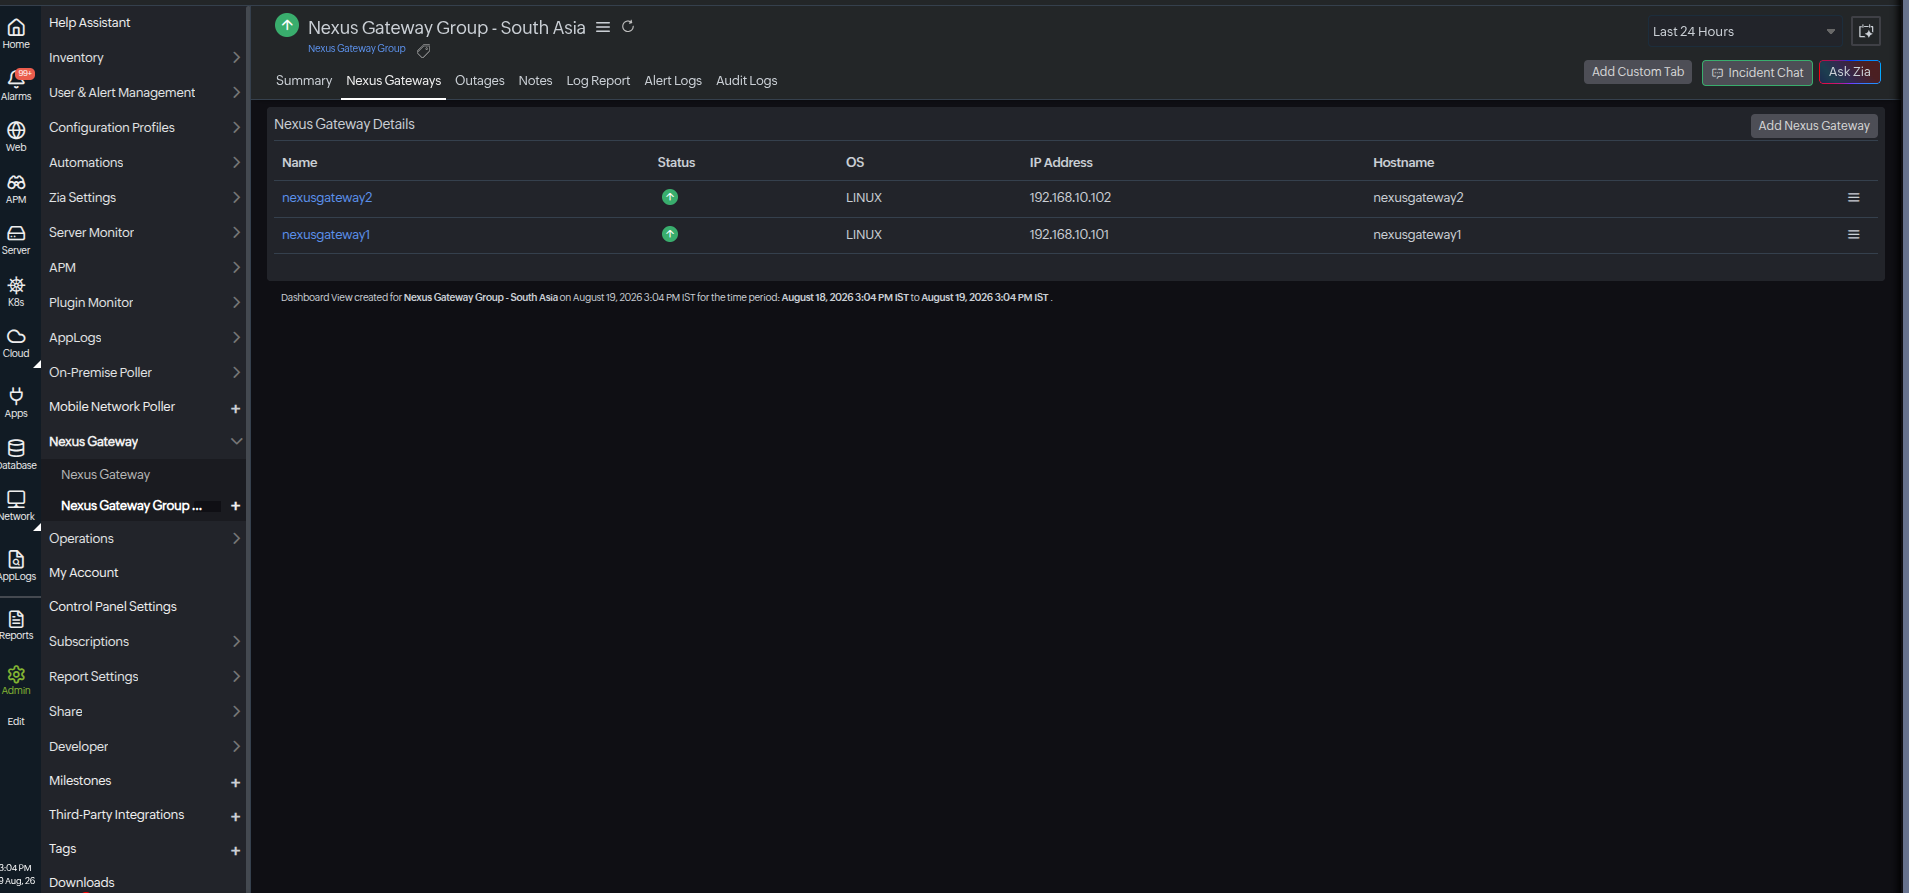
After installation, the Nexus Gateway connects automatically and is listed in Site24x7 under Admin > Nexus Gateway > Nexus Gateway.
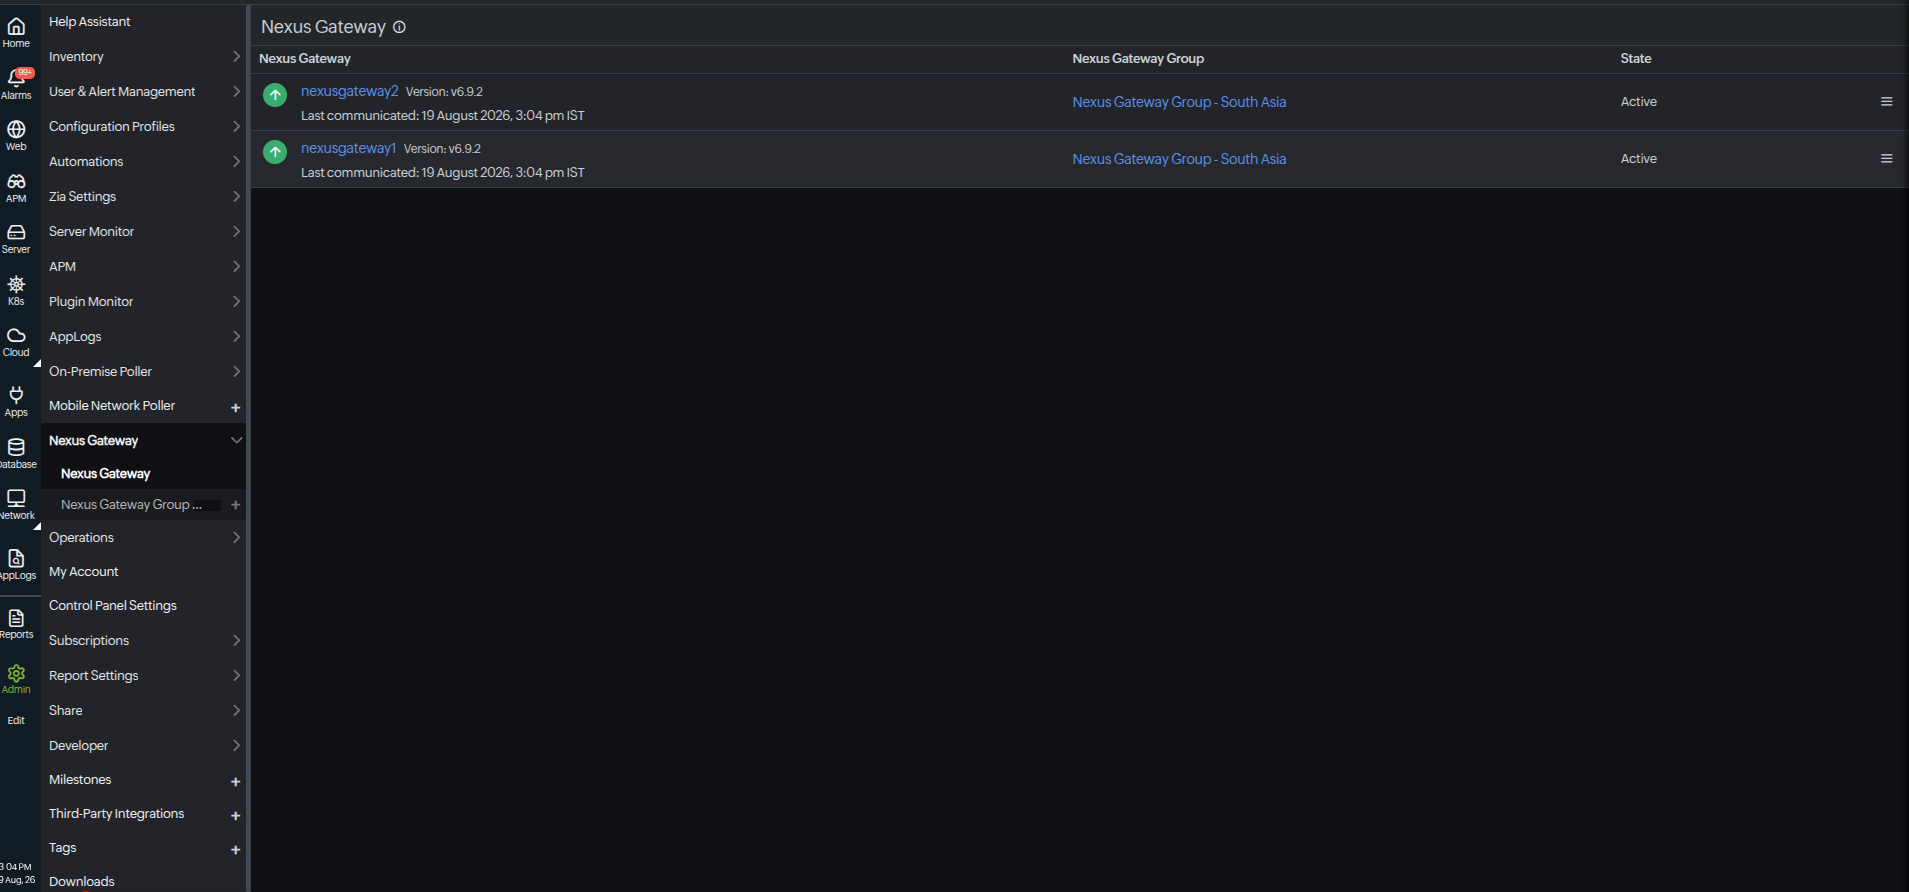
It will also be listed under the assigned group. To view this, navigate to Admin > Nexus Gateway > Nexus Gateway Group. Select the desired Nexus Gateway Group, then click the Nexus Gateways tab to view all associated Nexus Gateways.
Adding a Nexus Gateway
After creating a Nexus Gateway group, proceed with the following steps:
- Log in to your Site24x7 account.
- Click Admin > Nexus Gateway > Nexus Gateway Group.
- Select any one of the created Nexus Gateway Groups.
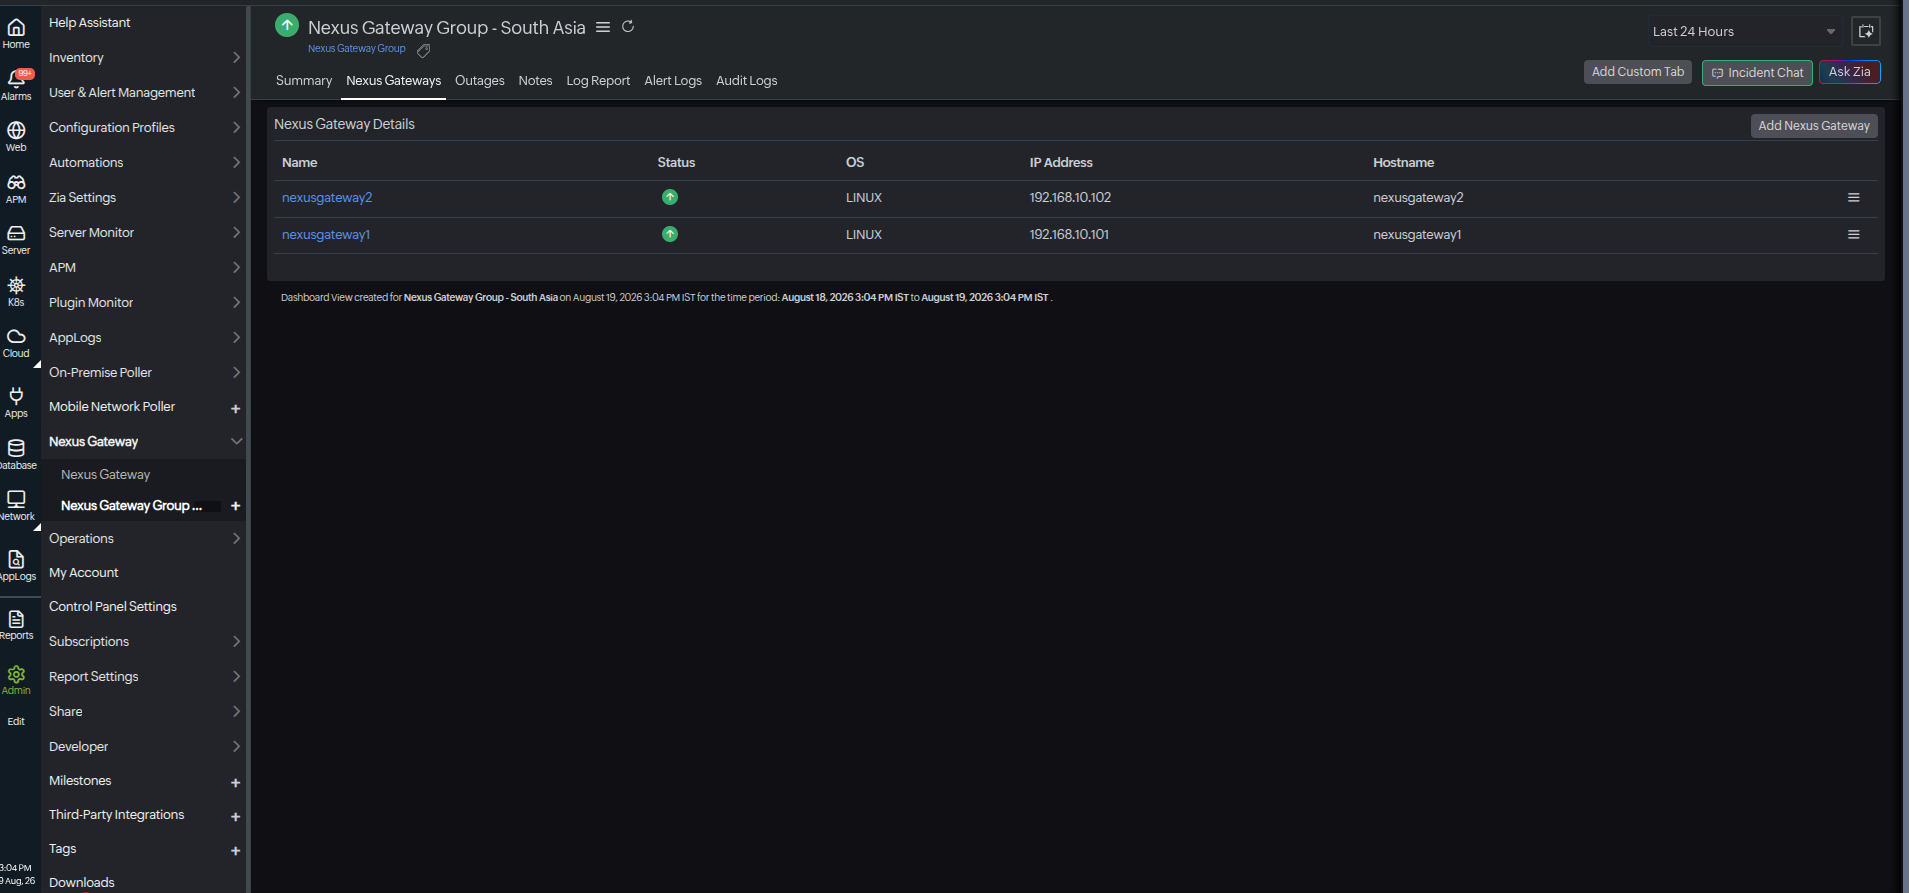
- If Nexus Gateways already exist in that group, you can add one by clicking the Add Nexus Gateway button in the top-right corner of the page.
- If the group has no Nexus Gateways, click No. of Nexus Gateways: 0 to begin the installation process and add your first Nexus Gateway.
- Verify the installed Nexus Gateway.
Edit a Nexus Gateway
To edit the existing Nexus Gateway, follow the steps:
- Go to Admin > Nexus Gateway Group > Nexus Gateway.
- Alternatively, you can go to Admin > Nexus Gateway Group > Choose any one of the Nexus Gateway Groups > Select the Nexus Gateways tab.
- Choose the Nexus Gateway that you want to edit, then click the hamburger icon
 and click Edit.
 - Change the necessary details to edit the Nexus Gateway
- Display Name: Provide a display name to identify the Nexus Gateway
- Host Name: Displays the domain name for the Nexus Gateway host
- IP Address: Displays the IP address for the Nexus Gateway
- Nexus Gateway Details: Displays the technical details of the Nexus Gateway, such as the OS, architecture, and kernel version
- Version: Displays the software version of the Nexus Gateway
- Specify the details for Configuration Profiles:
- Threshold and Availability: Select the threshold profile to be associated with the server monitor. A threshold profile contains the list of all thresholds and the alert type (i.e., Critical, Trouble, or Down) that will be triggered when these thresholds are breached.
- Click the pencil icon
 to edit the selected threshold profile and the plus icon + to create a new threshold profile.
- Click the pencil icon
- Tags: Associate your monitor with predefined tags to help organize and manage your monitors creatively. Learn how to add Tags.
- Threshold and Availability: Select the threshold profile to be associated with the server monitor. A threshold profile contains the list of all thresholds and the alert type (i.e., Critical, Trouble, or Down) that will be triggered when these thresholds are breached.
- Specify the details for Alert Settings:
- User Alert Group: Select the user group that needs to be alerted during an outage. To add multiple users to a group, see User Alert Groups.
- On-Call Schedule: Choose an On-Call Schedule from the drop-down menu to stay updated via notifications in case of any incident or outage. Learn how to use an On-Call Schedule.
- Notification Profile: Choose a Notification Profile from the drop-down menu or select the default profile available. A Notification Profile helps to configure when and who gets notified in case of downtime. Refer to Notification Profiles to create a customized Notification Profile.
- Click Save.
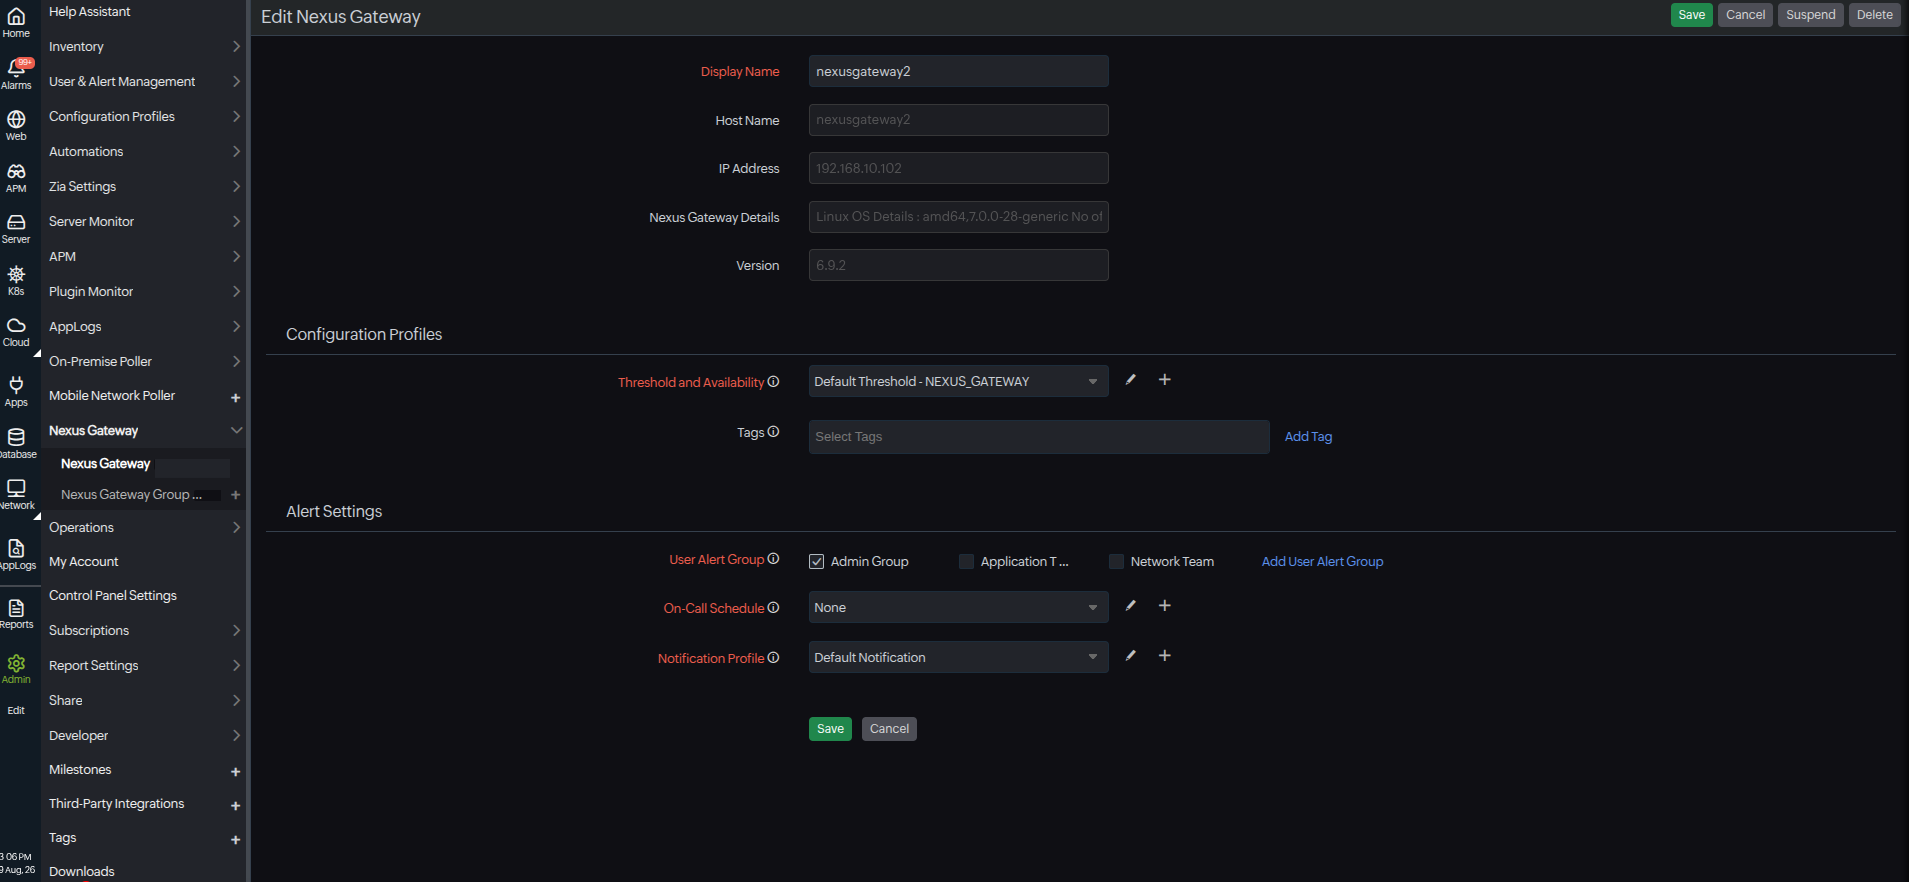
Once you have updated the above steps, your Nexus Gateway will be configured according to the specific thresholds, availability settings, and other relevant details defined within the dedicated Nexus Gateway Group, ensuring optimal performance and reliability.